PathAdvisor Sampling Guide for Canvas (LTI 1.3)
This guide provides step-by-step instructions for Canvas Admins to setup PathAdvisor into their Canvas LMS environment for sampling and testing.
By following these instructions, you will be able to add PathAdvisor to your Canvas, verify the integration, and start using it.
Table of Contents
- Prerequisites
- Create a Developer Key
- Enable the Developer Key
- Add the Tool to Canvas Apps
- Add the Tool to Courses
- Submit Your Configuration
- Verify Integration
- Troubleshooting Common Issues
- Support
1. Prerequisites
Before starting the setup, ensure you have the following:
- Canvas Admin Access.
- Permissions to add and configure Developer Keys and Apps in Canvas.
2. Create a Developer Key
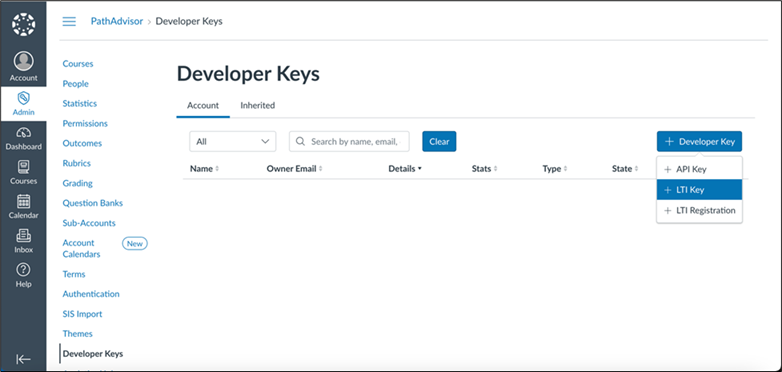
Step 2.1: Access Developer Keys
Log in to Canvas as an Admin
- Navigate to Admin -> Developer Keys
- Click + Developer Key -> LTI Key
Step 2.2: Choose Configuration Method
You can configure the tool using one of the two available methods:
- Manual method:
Visit https://demo.ckcentral.careerkey.org/#/lti/setup to get all configuration values required to set up the LTI tool in Canvas.
- JSON method:
If you prefer to use the JSON configuration, Career Key will provide you the JSON configuration file separately.
Step 2.3: Add Redirect URIs
Add the Redirect URIs in the Developer Key setup screen. Add the following two URIs exactly as shown:
https://pathadvisor-service-sandbox.careerkey.org/lti/tools/launches
https://pathadvisor-service-sandbox.careerkey.org/lti/tools/deep_link_launches

Click Save to add the Developer Key.
3. Enable the Developer Key
- After saving, toggle the State of the Developer Key to ON.
- Copy the Client ID (Details Column) from the Developer Key.

4. Add the Tool to Canvas Apps
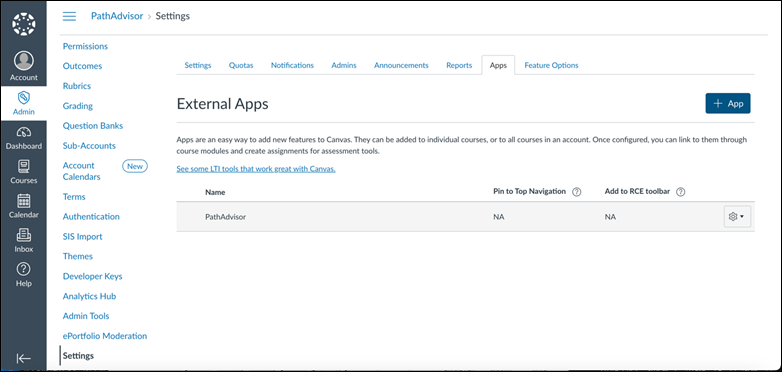
Step 4.1: Navigate to Canvas Apps
Go to Admin -> Settings -> Apps -> View App Configurations -> + App
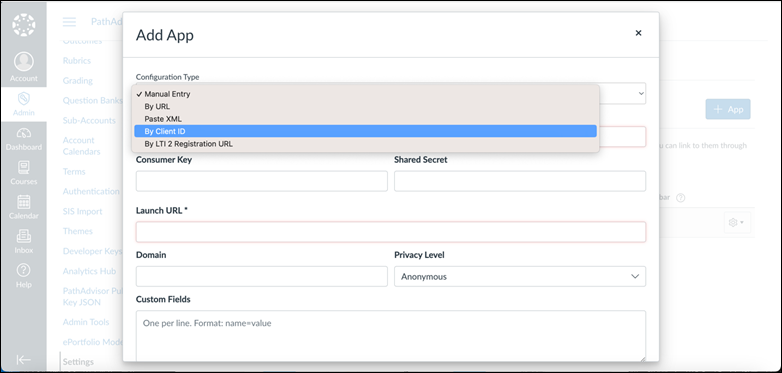
Step 4.2: Configure the App
- Select By Client ID as the Configuration Type.
- Paste the Client ID you copied from the Developer Key.
- Click Submit.
- Authorize the app when prompted.
5. Add the Tool to Courses
Option 1: Add to Module
- Navigate to a Course -> Modules
- Click + Module Item


3. Select External Tool.
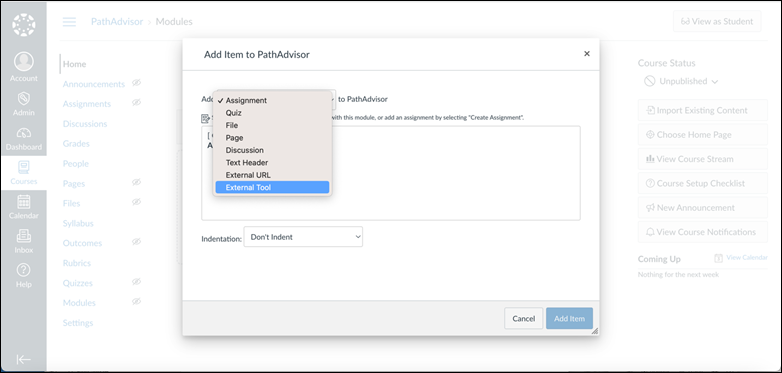
4. Choose PathAdvisor from the list.

5. Click Add Item.
Option 2: Add to an Assignment
- Navigate to a Course -> Assignments
- Click + Assignment

3. Under Submission Type, select External Tool.

4. Click Find and select PathAdvisor.

5. Click Save and Publish.
6. Submit Your Configuration
Once you have completed adding the LTI tool in Cavnas:
- Return to https://demo.ckcentral.careerkey.org/#/lti/setup
- Enter your Canvas configuration details including your email and your organization details and submit.
7. Verify Integration
- Navigate to the course where you have added PathAdvisor.
- Launch PathAdvisor.
- Verify that the tool launches successfully and behaves as expected.
- Confirm if any additional settings are required within your tool.
8. Troubleshooting Common Issues
Issue | Solution |
Tool not visible in Assignments or Modules | Ensure the app is properly configured under Admin -> Settings -> Apps |
Launch error when opening the tool | Verify the Developer Key is enabled and the Client ID matches the app configuration |
Unauthorized or invalid access | Ensure correct permissions are set and the JSON configuration is accurate. |
9. Support
If you encounter any issues or need further assistance:
- Email: support@careerkey.org
- Support Portal: https://www.careerkey.org/support
Our team is ready to assist you with setup or troubleshooting during your sampling period.
You’re All Set!
Once your configuration is submitted and verified, you can start exploring PathAdvisor directly within your Canvas.
Thank you for sampling PathAdvisor by Career Key. We are excited for you to experience its feature firsthand.